Sound Juicer Manual
- 1. Introduction
- 2. Entering Track Data
- 3. Extracting
- 4. Playing
- 5. Preferences
1. Introduction
Sound Juicer is a simple and clean CD ripping tool. It allows you to extract the audio from audio compact discs and convert them into audio files that your computer can understand and play. Sound Juicer can also play the audio tracks directly from the CD, allowing you to preview the CD before ripping it.
Sound Juicer is designed to be easy to use, and to work with little user intervention. When you start Sound Juicer, it will examine the CD in the drive and try to locate information about the audio tracks using the freely-available MusicBrainz service.

2. Entering Track Data
When you insert an audio CD, Sound Juicer will automatically retrieve the track data from MusicBrainz. MusicBrainz is a free service that provides a database of data for most published CDs. Sound Juicer uses the CD's serial number and the positions and lengths of the tracks to match against CDs in the MusicBrainz database.
Occasionally, more than one CD will have the same layout. If more than one CD is found, Sound Juicer will present a dialogue allowing you to choose which CD data to use. If the wrong CD is detected, or if MusicBrainz does not contain any matching CDs, you will have to enter the track information manually. Also, if you choose, you can add the information for the CD to MusicBrainz database with a banner that will appear.
The top of the window contains text boxes for the title, artist, year, and genre of the CD. Below that is a list of the audio tracks on the CD. You can set the track title and artist for each track. Sound Juicer uses this information to name the files and folders where your music is stored. The track and album information is also encoded directly into the audio files. Many music players, including portable devices, use this information to organise and display the audio files.
To edit the title of a track, first select the track, then click on the title. When you have finished entering the title, press the Enter key on your keyboard, or click outside the title.
When you edit the artist for the CD, the artist for each track is automatically updated, but only if they also matched before the change (so that changing the album artist of a compilation doesn't change all of the track artists too). Most CDs are by a single artist, and this feature saves you the time of entering the artist for each track.
Some CDs, however, are compilations of songs by different artists. For these CDs, you will have to enter the artist for each track. To set the artist for a track, first select the track, then click on the artist. You can set the artist for the CD to a value like "Various" or simply leave it blank, depending on how you prefer to organise your music.
You can enter track data without using the mouse. Use the up and down arrow keys to select a track, and the left and right arrow keys to focus the title or artist. Press the space bar to begin editing the title or artist, and press Enter when finished.
MusicBrainz unfortunately does not provide genre data, but Sound Juicer includes several stock genres:
- Ambient
- Blues
- Classical
- Country
- Dance
- Electronica
- Folk
- Funk
- Jazz
- Latin
- Pop
- Rap
- Reggae
- Rock
- Soul
- Spoken Word
If you choose to make a custom genre, it will be remembered in the future.
3. Extracting
By default, Sound Juicer will extract all of the tracks on the CD to audio files. If you do not wish to extract all of the tracks, you can control which tracks are extracted using the check boxes in the first column of the track listing. Only the tracks you have selected will be extracted.
You can also use the and menu items to select all or none of the tracks to be extracted.
When you have entered all the information you need, click on the button, or press Ctrl+Enter. Sound Juicer will begin reading the audio from the CD and saving it to files on your computer. By default, the audio files are stored under the Music folder in your home folder.
When you begin extracting, the button will change to a button. You can click this button at any time to stop extracting.
Sound Juicer indicates which track it is currently extracting by displaying an icon next to the track number. You can also see the total progress and estimated time left in the status bar at the bottom of the window.
Extracting a CD can take a long time, depending on the speed of your computer. You can safely minimise Sound Juicer or move to another workspace to continue using your computer while the audio is being extracted.
4. Playing
Sound Juicer allows you to play the tracks on your CD directly. To begin playing the CD, simply click the button, or press Ctrl+P. To play a particular track, select that track and click , or simple double-click the track.
When Sound Juicer is playing a CD, the button changes to a button. You can click this at any time to pause the playing, and click again to continue playing where you left off.
While playing, Sound Juicer displays a slider showing the position on the current track. To seek to another part of the track, drag the handle along the slider and release.
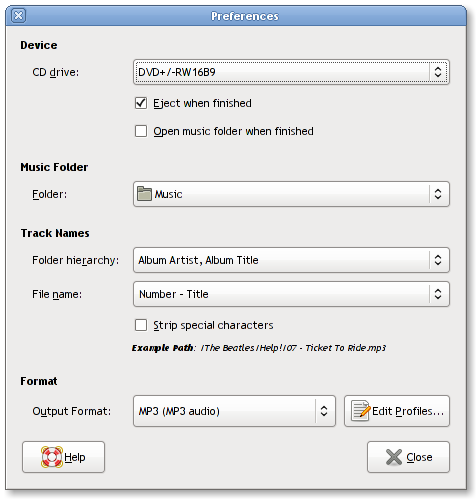
5. Preferences
The preferences window allows you to control:
- Which CD drive Sound Juicer uses, if you have more than one drive,
- Whether to eject the CD when Sound Juicer is finished extracting,
- Whether to open the music folder when Sound Juicer is finished extracting,
- Where the extracted audio files are placed on your computer,
- Which system to use for the folder hierarchy in the music folder,
- Which format to use for the track names of the extracted audio files, and
- Which file format and codec are used for the extracted audio files.
- 5.1. Selecting a CD Drive
- 5.2. Naming Audio Files
- 5.3. Selecting a Format
5.1. Selecting a CD Drive
If you have multiple CD drives in your computer, the drop-down list labelled CD drive under Device allows you to select which drive to use. The check boxes and allow you to control whether Sound Juicer will eject the CD from the drive, and whether it will open your music folder, respectively, when it has finished extracting the audio files.
5.2. Naming Audio Files
The Music Folder drop-down list allows you to select which folder to store your audio files in. Select one of the folders from the list, or choose Other to select another folder with the file chooser. By default, files are placed under the Music folder in your home folder.
The Track Names section allows you to control how the files and folders are named. Sound Juicer can store audio files in seperate folders, helping you keep your music organised. You can choose how these folders are created and named using the Folder hierarchy drop-down list. By default, Sound Juicer creates a folder for the album artist and a subfolder for the album.
Use the File name drop-down list to select how the audio files are named. By default, Sound Juicer uses the track number followed by a hyphen and the track title.
Select the check box to make Sound Juicer remove or replace characters such as spaces and punctuation in the filenames. This is useful if you plan to put the audio files onto a portable device or another computer which has more limitations on file names.
Even when is not selected, Sound Juicer will remove the / character from filenames. This character cannot be used in any filenames on UNIX, Linux, and similar systems.
At the bottom of the Track Names section, an example path is shown. This lets you know what a file name might look like and where it is placed, according to your settings for Folder hierarchy, File name, and .
5.3. Selecting a Format
You can select which audio file format Sound Juicer uses to store your tracks on your computer. There are a number of available formats, each with its own advantages. The available formats on your computer may vary, but the following choices are usually available:
- CD Quality, Lossy (Ogg multimedia)
-
This option is selected by default. Ogg Vorbis, like other lossy audio formats (such as MP3 and AAC) discards some information from the original audio data. Although the audio file is not a perfect replica of the CD audio, the differences are often not distinguishable to most listeners. As a result, lossy formats tend to have very small file sizes.
The Ogg Vorbis format is the default lossy format used in Sound Juicer. Ogg Vorbis is an open format, developed by the Xiph.Org Foundation, which tends to produce smaller file sizes and higher quality audio than many other lossy formats. While it is not as widespread as the older MP3 format, most music software can play Ogg Vorbis files, and many hardware players have incorporated support.
Xiph.Org maintains lists of software players, portable hardware players, and static hardware players which support Ogg Vorbis.
- CD Quality, Lossless (FLAC audio)
-
The FLAC audio format is a lossless format. No audio data is lost when converting to FLAC, even though it compresses audio files by as much as 70%. FLAC and other lossless formats are popular in cases where high fidelity audio is needed, but files need to be compressed to save disk space and network transfer times.
- CD Quality, AAC (MPEG-4 audio)
-
The AAC (short for Advanced Audio Coding) audio format is a standardised lossy format. It is a successor to the MP3 format and it achieves better sound quality than the MP3 format. Many software players and hardware players support the AAC format.
- Voice, Lossless (WAV audio)
-
The Voice output profile produces low-quality mono audio files. You may wish to select this for lectures, books on tape, and other spoken word CDs, where the loss in audio quality is less important.
- MP3
-
The MP3 audio format is a lossy format. It is widely supported and popular, especially because of its use for portable media players.
You can click the button to edit the available audio formats. The profile editor dialogue provides direct access to the audio conversion. Profiles are defined with GStreamer pipelines. GStreamer is the underlying multimedia library used by Sound Juicer and other multimedia applications. A full explanation of audio profiles is outside the scope of this document.